|
Sewing Machine Basics – Know Your Sewing Machine
Knowing sewing machine basics means more than just knowing the basic operation of a sewing machine. Sewing machine basics also means becoming familiar with the parts of the machine. Why is this even necessary? It is necessary because without knowing what the parts of the machine are, it’s difficult to have a good grasp of how the machine works. The sewing machine is not merely a passive machine that you just start sewing with. The sewing machine has parts that may require adjustment to sew properly; it has parts that allow the sewer to choose different stitches for different projects. There are adjustments to what are called the stitch length, stitch width and machine tension that determine how the stitches look and how they form on the fabric. So, knowing the basic parts of the machine is important.
What are the basic parts that sewing machines have in common?


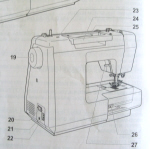
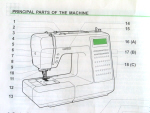
1. Tension Dial - controls the upper thread tension for proper stitch formation. 2. Bobbin Thread Guide - upper thread goes through this guide when threading the machine to wind the bobbin. 3. Upper Thread Guide - the first guide to be threaded for threading the machine. 4. Thread Take-up Lever - the second guide to be threaded for threading the machine. 5. Face plate - this area of the machine opens to provide access to the machine’s light for changing the light bulb, and is also the location of the presser foot regulator. 6. Needle up/down position button - this button allows the needle to be placed in the needle down position into the fabric for sewing, and is used to raise the needle from the fabric after sewing. 7. Auto Lock Button - this button is held down to sew locking stitches before and after completing the stitches. 8. Thread Cutter - a sharp knife-like projection used to cut thread after sewing. 9. Reverse Button - this button is held down to sew stitches in reverse or to reinforce stitches at a slow speed. 10. Buttonhole Lever/sensor - a pull down lever that helps to stop the machine at the appropriate position for the size of the buttonhole chosen. 11. Automatic Needle Threader - a pull down lever that helps to thread the needle through the eye. 12. Needle Plate - the flat metal plate that covers the bobbin area and supports the fabric during sewing, and is also a gridded plate with seam allowances marked on the plate to assist in accurate sewing. 13. Free-Arm Cover - this area provides a storage area and has a removable free-arm that provides a narrow work area over which sleeves can be inserted for sewing. 14. Speed Adjustment Lever - a dial or sliding control for increasing or reducing the speed at which the machine sews. 15. Bobbin Winder Spindle - holds the empty bobbin and winds the thread from the spool of thread for use in the bobbin housing, which is the lower thread unit. 16. LCD Screen - An illuminated screen which displays the stitch that is being used. 17. Function Buttons - used to select the stitch width and stitch length. 18. Stitch Selection Buttons - used to select the different stitches available on the machine. The stitch library increases on machines that have more features such as for quilting, embroidery, heirloom sewing, and home décor sewing. 19. Handwheel - this is also called the balance wheel and can be turned to move the needle up and down manually. 20. Main Power Switch - turns the machine main power on and off, also turns the built in lighting on and off. 21. Foot Controller Connector - used to connect the foot controller that controls the machines sewing. On computerized machines there is a start/stop button that can be used instead of the foot controller for better control of sewing. 22. Power Cord Receptacle - the place to connect the power cord to the machine. 23. Hole for Second Spool Pin - this holds an additional spool pin and an additional spool of thread, which is generally a vertical spool, in addition to the built in horizontal spool pin. 24. Handle - this is a convenient carrying handle for when the machine needs to be moved. 25. Horizontal spool pin - the built in primary thread spool holder. 26. Drop Feed Lever - the lever used to raise and lower the feed dogs. The feed dogs often need to be lowered for the use of specialty presser feet. 27. Presser Foot Lever - the lever that raises and lowers the presser foot for sewing and for raising the presser foot for changing the presser foot.
Knowing sewing machine basics, the parts of the machine also helps the sewer to maximize the performance of their machine. Since the location and configuration of these parts vary depending on the manufacturer, it is best to consult the owner's manual diagrams that label the various parts of the machine.
For diagrams of different sewing machines and their parts click here for sewing machine basics The diagrams used to show these sewing machine basics show a variety of machine parts for machines by Husqvarna, Singer, EuroPro and Brother.
Some good references for information about sewing machine basics, demonstrating the parts of the sewing machine are:
• Simplicity’s Simply the Best Sewing Book – revised edition
• The Sewing Book by Alison Smith
For other great information related to learning about and maintaining your sewing machine, click on the links below. Threading Sewing Machines
|


